Lloyd's Sample Maker: a Free Max for Live Device That Turns a Jam into a Sample Pack
Lloyd's Sample Maker (LSM) is a Max for Live device for Ableton Live 12. You put it on a track, group or the master, press Record, play for a while, press Record again, and the device cuts the take into sounds or loops. You listen to each one and press Save or Skip. Saved sounds land in your sample pack folder as 24-bit WAV files with a clean name and a number. No exporting, no renaming, no list of what you already did.
Download Lloyd's Sample Maker 1.0.3
The zip holds the device (one .amxd file, nothing else to install) and the manual as a PDF.
Ableton Live 12 Suite, or Live 12 Standard with Max for Live · Windows and Mac
Why I made it
I wanted to make sample packs, and every time I started one it turned into a chore. Record, export, trim, name, number, move the file to the right folder, keep a list of what I had already done. The sampling was fun. The bookkeeping was not. So I built a device that does the bookkeeping while I jam on my drum machines and synths.
I made it for myself, and it works the way I find handy. Because it saves me so much time and I had already built it anyway, I am sharing it here for free. Fair warning: it is built around my own way of working, so you will have to like my way of doing things. The manual is six pages. The short version is below.
How it works
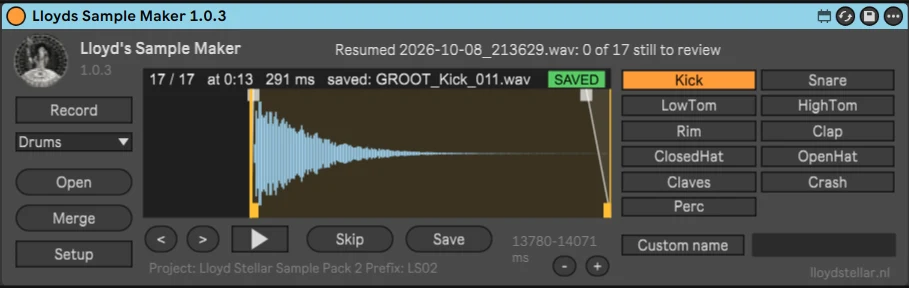
-
Put it on a track
Drag the device onto an audio track, a group or the master, after the instrument or input you want to sample. It records whatever comes into it, so put it where the sound is the way you want it on disk, with or without effects. The first time, Setup opens by itself: fill in a project name and a prefix and click Save & Close. Files go to Documents / Lloyds Sample Maker / your project.
-
Pick the sound type
Drums for one shots, Synth for pitched one shots, Drum loop or Synth loop for loops at Live's tempo, FX and Vocal for the rest. One shots and loops are cut differently, so this choice decides how the take is split.
-
Record
Click Record. It turns red and Live's transport starts, so hardware on MIDI clock runs along. Play for as long as you like: a minute of kicks, a whole jam.
-
Stop
Click Record again. The take is written to the _takes folder and cut into sounds. The status line at the top right says how many it found. When something does not work, look there first.
-
Listen and trim
The first sound is shown and plays. Orange lines are the start and the end; drag them. The small handles at the top are the fade in and fade out. Loops keep whole bars, so for a loop the start and the end move together. Merge joins the current sound with the next one, for rolls and flams that were cut in two.
-
Say what it is
On the right you pick what the type needs: the drum type for drums, the note for synths (the device detects it, pick another if it is wrong), bars and BPM for loops, the key for vocals. The choice stays for the next sound, so a row of kicks is one choice and then Save, Save, Save. Custom name adds your own word to one file.
-
Save or Skip
Save writes the file and jumps to the next sound. Skip leaves it out. You cannot go forward past a sound you have not decided on, so nothing slips through. When the last one is done, a Done message tells you how many you saved and skipped. Record again for the next take.


The six sound types
The type you pick on the left decides how the take is cut and what goes into the file name.
| Type | What it is for | In the file name |
|---|---|---|
| Drums | One shots. Pick the drum type on the right: Kick, Snare, LowTom, HighTom, Rim, Clap, ClosedHat, OpenHat, Claves, Crash or Perc. All drums land in one folder, so a pack of eleven kinds of hits stays one list. | Kick, ClosedHat |
| Synth | Pitched one shots. The device detects the note (C3 is MIDI 60, Ableton notation) and shows it above the waveform. Wrong? Pick another in the menu. Chords, pads and noise get "note ?" and use C3 unless you pick one. | C3, F#2 |
| FX | Anything that is not a drum, a note, a loop or a voice. No extra choice. | FX |
| Vocal | Pick the key by hand (Cmaj, Amin, and so on, or No key). Automatic key detection is not reliable for voices, so this one is yours. | Cmin |
| Drum loop | The take is cut into loops of whole bars at Live's tempo, starting at the first hit. Pick 1, 2, 4, 8 or 16 bars. Recorded an old loop at another tempo? Set the BPM for that loop in the BPM field, or set Loop BPM in Setup for the whole take. | 124BPM |
| Synth loop |
File names and folders
Every saved sound follows one pattern:
Prefix_Type_Hardware_Extra_Custom_001.wav
| Part | What it is | Example |
|---|---|---|
| Prefix | Yours, from Setup. Keeps packs apart. | LS01 |
| Type | Kick, Snare, ClosedHat and so on for drums. Synth, DrumLoop, SynthLoop, FX or Vocal for the rest. | Kick |
| Hardware | Optional, from Setup, Tools. The machine or synth you sampled. | TR808 |
| Extra | The note for synths, the BPM for loops, the key for vocals. | C3, 124BPM, Cmin |
| Custom | Your own word for this one sound. Optional. Spaces become underscores. | FatBoy |
| Number | Counts up per type, never overwrites. | 001 |
So a pack looks like LS01_Kick_TR808_001.wav, LS01_Synth_SH101_F#2_012.wav, LS01_DrumLoop_124BPM_003.wav and LS01_Vocal_Cmin_Yeah_001.wav.
Inside your project folder the files are sorted into Drums / OneShots, Drums / Loops, Synths / OneShots, Synths / Loops, FX and Vocals. The raw recordings sit in _takes; delete those when the pack is done. Files are 24-bit WAV at the sample rate of your Live Set, normalized to the peak level from Setup (default -0.1 dB, full scale without clipping), each with a short fade in and out against clicks. Saving the same sound twice is not possible: Save on a saved sound only says "Already saved" in the status line. If you really want a second version, Skip it first and then Save.
It remembers where you were
This is different from most devices. The device keeps its own memory outside the Live Set: your project, prefix, settings and the take you were reviewing. When you load it again, in the same set or in a different one, it continues where you left off and shows a short "Welcome back" message over the waveform.
Why: a sample pack usually comes from several Live Sets. You open an old track, drop the device on it, sample a few sounds, open the next track, and the numbering and the folder stay the same. One pack, many sets. To start a new pack: Setup, Project, New project. That clears the project name, the prefix and the take. Saved files stay where they are.
Setup: four pages
Setup slides over the display and the Setup button becomes Save & Close. Drag a dial, Shift-drag for fine steps. Changes to the split apply to the next take, or to this one when nothing is saved from it yet.


One more button on the main screen: Open loads a WAV you recorded earlier, for example a bounced track, and treats it as a take. A short file with a loop type is treated as one loop; the BPM comes from the file name (124BPM, 124bpm) or from its length.
What you need and how to install
- Ableton Live 12 Suite, or Live 12 Standard with Max for Live. Windows or Mac.
- The file Lloyds Sample Maker 1.0.3.amxd from the zip. That is the whole device; nothing else to install.
- Something to sample: a synth plug-in, a drum machine on an audio input, an old track.
Copy the .amxd anywhere you like. A good place is your User Library, under Presets / Audio Effects / Max Audio Effect, so it shows up in Live's browser. Hover over any button and open Live's Info View (bottom left corner of Live) for a short explanation of that button. The device is light on CPU; you can leave it on a track.
Frequently asked questions
Is Lloyd's Sample Maker free?
Yes. The device and the manual are a free download, with no account, no trial and no paid version. Like everything on Lloyd Stellar's Homepage.
Which version of Ableton Live do I need?
Ableton Live 12 Suite, or Live 12 Standard with Max for Live, on Windows or Mac. Earlier versions of Live are not supported.
Where do the samples go?
To Documents / Lloyds Sample Maker / your project, in the folders Drums / OneShots, Drums / Loops, Synths / OneShots, Synths / Loops, FX and Vocals. The raw recordings are in _takes. You can change the folder with Browse in Setup.
Can I use the samples in my own packs and tracks?
Yes. The device ships no sounds of its own; it records what comes into it on your track. What it saves is your own recording, so it is yours to use.
The status line says "Split: 0 sounds". What now?
The take was silent, or quieter than the Threshold in Setup, Split. Check that the device sits after the sound source on the track and that the track is monitoring, then record again.
Can I change where a sound was cut?
Yes. Drag the orange start and end lines, drag the fade handles at the top, and zoom with - and +. Merge joins the current sound with the next one, for rolls and flams that were cut in two. For loops the start and end move together, so a loop always stays whole bars.
Can I cut a recording I made earlier?
Yes. Open loads a WAV you recorded earlier, for example a bounced track, and treats it as a take. A short file with a loop type is treated as one loop; the BPM comes from the file name (124BPM) or from its length.
Something is wrong. What should I send you?
Run Self test in Setup, Tools. Then send the log file Documents / Lloyds Sample Maker / lsm.log through the contact form with a few words about what you did.
More free tools, and what the samples are for
Lloyd's Sample Maker is one of the free music tools on this site, next to the online TR-808 and the two Lasers plugins. If you want to hear what my own jams end up as, my electro is on Bandcamp, and the story behind the studio is on the About Me page.